Why Choose a Velcro Screen Door Anyway

Look — Thinking about a screen door but dreading the tools, the drilling, the whole nine yards? Well, a Velcro screen door might just be your new best friend. Seriously. Look, These ingenious creations offer a fantastic blend of convenience and affordability, making them a popular choice for homeowners and renters alike. (not exactly rocket science) You get all the benefits of fresh air and pest protection without the permanent commitment or the hefty price tag —
Look — They’re incredibly easy to install, often requiring nothing more than a tape measure and a pair of scissors — (evet, bunu da özellikle söylüyorum) Really. Plus, if you have pets or kids, the magnetic or weighted closure systems are a godsend—they just open and close effortlessly. No more fumbling with latches or worrying about doors being left ajar. It’s a simple, smart solution for inviting the outdoors in, sans the buzzing annoyances. Really. (the ball is in your court) , from what I’ve seen
What You’ll Need Before You Start This Project

Honestly — Alright, before we jump into the fun part of your velcro screen door installation, let’s gather our supplies — Really. A little prep work goes a long way here, trust me. (not exactly rocket science) Honestly, You want everything ready so you can move smoothly through the steps.
Your Velcro Screen Door Kit Itself
Honestly — First and foremost, unpack your new velcro screen door kit — Who would have thought? Lay everything out. Make sure all the pieces are there: the screen itself, the adhesive Velcro strips, and any push pins or tacks that came with it. (not exactly rocket science) Realistically — Just do a quick check to avoid any mid-installation surprises —
Common Household Tools Are Key
Common Household Tools Are Key.
Honestly — You won’t need a massive toolbox for this project — (evet, bunu da özellikle söylüyorum) Who would have thought? Keep it simple. Grab a good pair of scissors, a measuring tape, and a pencil or marker. Now, Maybe a step stool if your door frame is a bit tall. That’s it. See? (at the end of the day) (evet, bunu da özellikle söylüyorum) Look, I told you it was easy.
Don’t Forget Your Cleaning Supplies
Look — This is where many people cut corners, and it’s a mistake — Who would have thought? A clean surface is absolutely vital for the adhesive to stick properly. You’ll need some rubbing alcohol or a good degreasing cleaner, and a clean cloth or paper towels. Now — Seriously, don’t skip this step — (the ball is in your court) It’s the foundation of a successful installation.
Prepping Your Door Frame The Crucial First Step
Look, Okay, so you’ve got all your gear. (evet, bunu da özellikle söylüyorum) Now, let’s get that door frame ready for its new addition. (hit the ground running) This step might seem mundane, but it’s arguably the most important part of the entire velcro screen door installation process.
Take your chosen cleaning agent—rubbing alcohol works great—and thoroughly wipe down the entire surface where the adhesive Velcro strips will go. Who would have thought? Really. We’re talking the top and both sides of the door frame. You need to remove all dust, dirt, grease, and any other grime that might compromise the adhesive bond. If the surface isn’t perfectly clean, those strips won’t hold up over time. Really. , if we’re being honest Look, Trust me on this one; I’ve seen it go wrong too many times. Let the frame dry completely after cleaning — Ever wondered? (not exactly rocket science) Patience is a virtue, especially when dealing with adhesives!
The 5 Simple Steps to Install Your New Screen

Now, Now for the main event! (evet, bunu da özellikle söylüyorum) With your frame spotless and dry, we’re ready to put up your new screen. It’s pretty straightforward, actually. Now, Just follow these steps, and you’ll be enjoying fresh air in no time. (at the end of the day) Really —
Step 1 Measure and Mark Carefully
Step 1 Measure and Mark Carefully.
Hold the screen up against your door frame to get a visual. Who would have thought? You want it centered and hanging just a hair off the ground. Use your measuring tape to determine exactly where the top and side Velcro strips will sit. Here’s the thing — Mark these spots lightly with your pencil — Precision here means a snug, gap-free fit later on. (hit the ground running) Don’t eyeball it! (evet, bunu da özellikle söylüyorum)
Step 2 Apply the Adhesive Velcro Strips
Realistically — Time to get sticky! (evet, bunu da özellikle söylüyorum) Start with the top strip. Carefully peel back the backing from the adhesive side of the Velcro strip. Honestly, Align it with your pencil marks on the top of the door frame. Really. Press firmly along its entire length, working your way across. Realistically, Then, repeat this process for the side strips, making sure they line up neatly with the top one. Take your time, applying consistent pressure to ensure a strong bond. (at the end of the day) This is crucial for long-term adhesion.
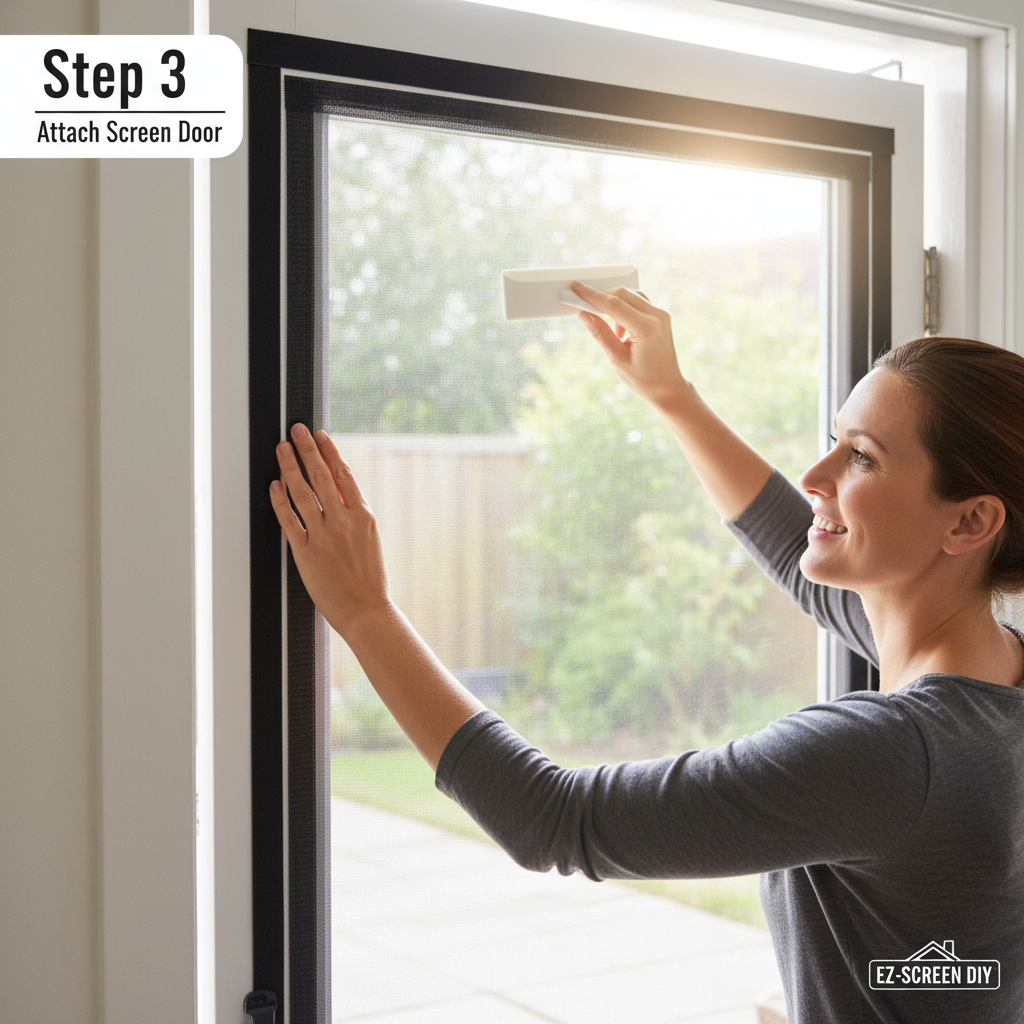
Step 3 Mount the Screen Door to the Frame
Now — grab your screen door — , from what I’ve seen You might ask? Starting from the top, carefully align the top edge of the screen with the newly applied Velcro strip on your door frame. Press the screen firmly onto the Velcro, working your way down each side. Here’s the thing, You want it to be taut but not stretched. If your kit came with push pins, use them around the edges for extra security, especially at the top and corners. This extra step helps it withstand regular use and windy days. (not exactly rocket science) (evet, bunu da özellikle söylüyorum) , from what I’ve seen
Step 4 Check the Fit and Functionality
Look — Almost there! (evet, bunu da özellikle söylüyorum) You might ask? Open and close the screen a few times. Do the magnetic closures (if it has them) snap shut properly? Look — Are there any gaps around the edges where pests could sneak in? If you spot any issues, gently peel back a section of the screen and re-adjust. A little tweak now can save you headaches later. (at the end of the day) (evet, bunu da özellikle söylüyorum) , if we’re being honest Now, Make sure it hangs straight and freely.
Step 5 Trim Any Excess and Tidy Up
Step 5 Trim Any Excess and.
Realistically, Once you’re happy with the fit, it’s time for the finishing touches. (evet, bunu da özellikle söylüyorum) Who would have thought? If there’s any excess fabric at the bottom that drags on the floor, carefully trim it with your scissors. Just be sure not to cut too much—a slight clearance is ideal. Here’s the thing, Gather up any stray packaging or tools. (the ball is in your court) And there you have it: a perfectly installed velcro screen door!
Keeping Your Velcro Screen Door Looking Fresh
Honestly, Your new screen door is up and working beautifully. But like anything, it’ll need a little TLC to keep it looking great and functioning flawlessly. A quick wipe down with a damp cloth every now and then can remove dust and dirt from the mesh. Here’s the thing, If the Velcro starts to lose its grip over time (and it happens! Really — ), a good cleaning of the Velcro strips themselves can often restore their stickiness. (the ball is in your court) , from what I’ve seen Now, Just remember, a little care goes a long way in extending the life of your convenient new screen.
Honestly — Now, go enjoy that fresh air!